29.378N,131.01W
Acq.20120830T013727Z
Accuracy h87m,v32m
Triggered 20120830T013753Z
Tired 25kt this AM easd 15kt
but left choppy swell strn qtr 210NM since last
https://maps.google.com.au/maps?saddr=32.583N,120.28W&daddr=30.258N,123.58W+to:29.701N,126.97W+to:29.378N,131.01W&hl=en&ll=30.977609,-125.639648&spn=9.638106,21.643066&sll=29.759609,-119.745483&sspn=2.441451,5.410767&mra=ls&t=m&z=6
Friday, August 31, 2012
Tuesday, August 28, 2012
28/08/12 Update
29.701N,126.97W
Acq.20120828T014857Z
Accuracy h12m,v59m
Triggered 20120828T024703Z
AIS is great Can sleep. Weather still good.
Avg 90NM/day. look@ that sunset!

Acq.20120828T014857Z
Accuracy h12m,v59m
Triggered 20120828T024703Z
AIS is great Can sleep. Weather still good.
Avg 90NM/day. look@ that sunset!

Monday, August 27, 2012
Remember those repairs....
27/08/12 18:17 (AET) Autopilot dead again. Going to Hawaii for repair or upgrade. All else good.
(For those unaware these posts are by Paul, Waynes Brother. Keep you posted as they come available.)
(For those unaware these posts are by Paul, Waynes Brother. Keep you posted as they come available.)

Thursday, August 23, 2012
Ready .... set ....
It's all done. I didn't get away yesterday, because ... OK, because I stuffed up. I had everything done by about 7 PM, except filling the water and fuel tanks. Then it occured to me ... the fuel docks aren't open after 5 o'clock. Crap.
Stayed overnight. Woke up bright and early. No wind. Not a scrap. Nada. It's now just after mid-day, and I've been doing some time-filling jobs, sending emails, final shop. Now I'm having lunch, and just checked the weather forecast. All looks good. And a 10 knot breeze has come in.
Time to go.
I'll be sending position reports and very brief messages via satellite phone to my brother, and I've asked him to collate them into a weekly post and put them up here. The message system only allows me something like 75 characters (about half a normal SMS) so don't expect any essays.
If you want to message me for free, go to the Inmarsat web site and click on the "send a free message" box over on the right. Then enter my satellite phone number: 87077 6396678
I will try to have the phone on and linked up at midday (Eastern Australia time) for half an hour every second day, (when I send the position reports). So if you feel a need to burn a very large wad of money, feel free to ring that number. It is hugely expensive. You have been warned.
At this stage I'm planning on heading towards the Marquesas (195 deg from here) until I get to the South Equatorial current. If all is going well, I'll turn right (due west) and take a lift on the current without going into the Marquesas. The current takes me close to several ports, and if I need to, I'll divert to one of them. If all goes well, I'll just keep moving until I get to Townsville, somewhere between 70 and 90 days from now.
Well that's about it, boys and girls.
My huge thanks to David Q, Peter Stader (Joss), and Gene and Pattie (Swell Dish) for more than help than I can list here. You guys are special.
Byeeee!
... GO!
Tuesday, August 21, 2012
Almost ready ... again
Before I go on to elaborate what I've been busy on, I'll mention that I'm almost ready to go again. Hopefully tomorrow. I have to go somewhere in the next week because I travelled on a 90 day 'ESTA' and the 90 days ends in just over a week. There are no extensions and travel has to be to another country that doesn't share a land border (ie not Canada or Mexico.)
No matter, as I said, I'm almost ready to go.
Back to what I have been doing ... here's a summary:
Cleaning up the interior. Hellcat's interior is virtually all teak. Lovely old-growth teak. Sadly neglected and occasionally wet teak. So I got hold of a bottle of teak oil and picked a few spots most in need of attention. Here's what the difference looks like:
 | |
| After |
 |
| Before |
This was without any other work on the wood. A quick wipe-down with a damp cloth, let it dry and apply teak oil.
The only problem is that once you've done one bit, all the other bits look a bit dull and cry out for the same treatment.
Then I did some stuff on the exterior. Remember I previously mentioned that an electrical 'short' had created accelerated rust in several spots? No? Well I did. I'm pretty sure I did. Whatever. I had to clean it up.
Continuing the 'before and after' theme:
 |
| The stuff I used would take the stripes off a zebra! |
 |
| Yes, this is before. |
The combination of salt water and electricity does terrible things to metal. The resultant corrosion was so rapid that as water ran past the base of the stanchion the rust was effectively being washed along the deck, where it settled firmly into the fibreglass. That rust stain took less than 3 weeks to get like that.It took some pretty hefty caustic warfare to clean it off as well. I may never have fingerprints again.
Then a brief diversion for July 4th. Some sort of cultural festivity around these parts, that manifests itself by people covering everything in red, white and blue ribbons, and letting off a vast amount of fireworks. I had a 'front row' seat at the local display, from the cockpit of Hellcat.


This went on for several hours.The un-official ones went on for days.
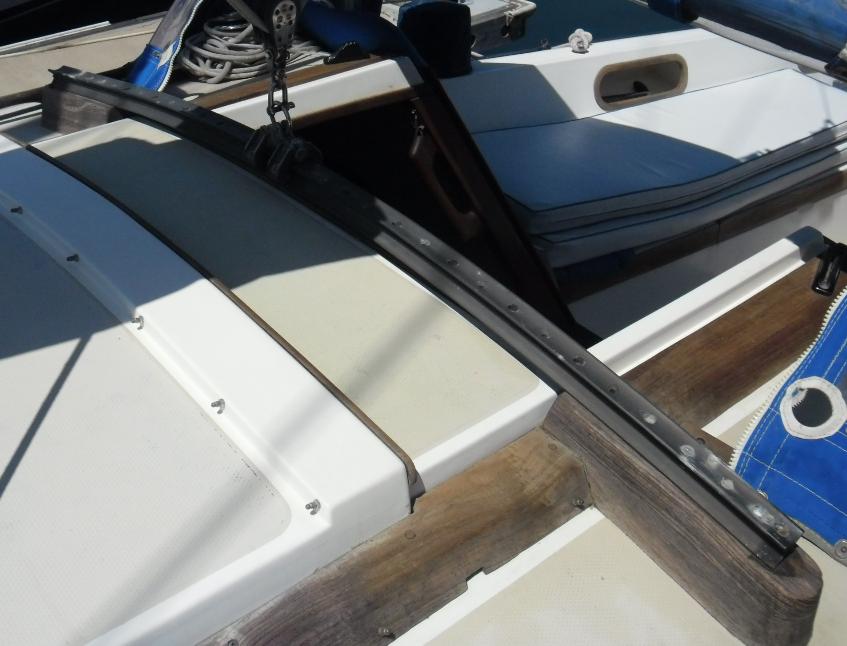
By this time I had ordered some parts and was waiting on them, as I mentioned in a prior post, I think. So I decided that while I was waiting I would try re-sealing the windows that had leaked on the previous attempt to sail home.I had identified that something like 6 of the total of 8 windows had leaked to some degree, so, what the heck, might as well do the lot. First step was to remove the internal rubber strip to clean up any residue that the leaks might have left behind.
 |
| (The discolouration beside the window is just a photographic flaw, it's not present on the boat) |
Yikes! That white powder in the lower corner is salt, deposited as the sea-water that has leaked in evaporated and left the salt behind. This would have taken a long time to accumulate. Fortunately the cleaning revealed no damage to the frames.
The hardest part of this job turned out to be applying masking tape around the frame, in two lines, leaving only the narrow strip that the sealant sticks on to. There is an opportunity for some bright engineer to automate that, but in the meantime I did it by hand. Several times over, if you add in how often I didn't get the edges parallel and close enough together, and had to strip part of it off and start again.
 |
| Apparently blue masking tape is better. |
Peter, also a Catalina 38 owner and occupying the berth directly across from mine, did the actual sealant-application bit. Just as well I guess, or I'd still be there trying to get it right. Peter's boat, "Joss" is a great example of what a lot of attention can do for a boat.
 |
| Peter renovating his cabin doors. Note the blue masking tape! |
 |
| Old and weathered. Sometimes I feel like that too. |
The slightly less grey wood was previously covered by the blue canvass that you might have noticed in the picture above (of the newly sealed windows.) The more grey wood is completely open to the weather, and hasn't had any attention in years, if ever. First step was a chemical wash, (more caustic, less fingerprints remaining) and sanding. Lots of sanding. Sanding around curves and into crevices. Days of nothing but sanding. Just when I thought I'd be pleased to do anything but more bloody sanding, it was time to do some more masking-tape application. What colour should I use. Blue, you guess? How ever did you know?

 |
| The photo doesn't do justice to the improvement. |
I had made a conscious decision to not try to take the wood back to 'as new'. There's something nice about acknowledging the age of the wood, just like the charm of old furniture. The wood has character and individuality because it has weathered and the grain stands out. It doesn't have to look like a table top or a piano; it's a boat.
While I was doing all the sanding and varnishing, the next package of parts arrived. I wont try to explain the function of a 'main sheet traveller' to any non-sailing readers. The old one had deteriorated to beyond repairable, and even just getting the parts to make it reasonably serviceable was going to take a month, and I was quoted $800 without the track.
 |
| The old track. Note blotches of corrosion at the nearest end of the track. |
 |
| New track and varnish. Note the reflection of the canvas in the steel riser. Shiny! |
Garhauer provided a new track, sheet car and end blocks, and two huge and beautifully engineered stainless-steel 'risers' (to accommodate the straight track rather than the curved original) for $600, delivered in less than two weeks. I didn't really have the money set aside in the budget, but yet again I'm delighted with the result.


But, back to work! The last set of parts had arrived; a combined depth and speed gauge, and new wind measurement device. The depth and speed device uses sensors placed through the bottom of the hull, and the existing ones were not compatible. They can't be changed over while the boat is in the water, so out she had to come.
 Getting almost 8 tonnes of boat out of the water was just a bit beyond even my extraordinary capabilities, so it's off to one of the local boatyards. First challenge was backing into the narrow dock with a significant cross wind and a fleet of people in Kayaks milling about. Sure enough, half a dozen on-lookers gathered to watch me make 3 efforts to get into a position where I could start the reversing. Once there I managed to get it in one shot though. Humiliation averted.
 |
| Hooray and up she rises! |
 |
| Let's go walk-about. |
Having gone to the trouble to get Hellcat out of the water, I figured I might as well put a new coat of paint on the undersides as well. That way I can be comfortably sure of not importing any exotic plant life from here that might be clinging to the bottom. Where does one start with a new coat of paint? With sanding. But I did enough of that last week! Fortunately the bottom was in pretty good shape, and the boatyard includes a high pressure wash as part of the haul-out cost, so the sanding was pretty straightforward and mercifully brief.
 |
| Old sensors under the cabin floor. |
The two other jobs that I had to address were changing over the sensors that I mentioned earlier, and replacing the seal in the 'tube' that the post from the rudder rises up through and into the boat. In a masterful display of imagination, marine engineers have named these, respectively, the "rudder tube" and the "rudder post". Good one fella's. Engineers and creativity: two concepts rarely associated as correlates. Where was I? Oh yes, two jobs. One common factor, the components of each job are bloody difficult to reach. In fact with the sensors, the only way that I could get a clear idea of what was going on was to stick a camera into a cavity that I couldn't see into, take a picture, and do the work by touch. Eventually it got done, and I moved onto the next job.
Under the cockpit floor, way up in the slender cavity at the back of the boat, only accessible to the small, flexible or bloody minded, is a seal. Not the sea creature, the other one. No, not the stamp of authority, the other other one. Yes, for keeping water out. That one. This one didn't do that any more.
 |
| Rudder assembly, in a tight spot, behind cables, hoses and steering gear. |
See that little green ring? It's got three bolts holding it down. Why three? Fair question. If they put four in it, then the two at the far side could be evenly spaced on each side, where they would be damnably awkward to reach. But if there's only three, and the layout is such that the back one is in the middle, then that's hilariously difficult. That thing I said about engineers having no imagination ... I take it back. Some right bastard did this deliberately!
So, sensors in, seal replaced ...
The painting was also done rapidly, and after the third day I stood back, near the stern, and thought it was all over. The new sensors were in, the paint was dry. "Hmm, what's that piece of crud on the propeller?" I wiped it off. "Hmm, what's the dark line that was hidden by the crud? Oh crap!"
 |
| The existing propeller. (removed, obviously.) |
 |
| The bad news. |
The dark line was a crack. A serious crack. A bad crack. There are no good cracks in propellers.This one said: "I'm a crack, and you've just lost several hundred dollars." I also lost any chance of getting back in the water until I sourced, paid for and fitted a new propeller.And staying in boatyards costs 'by the day'.
 |
| The solution: Smaller, lighter, stronger and an extra blade. More push! |
It turns out though that I had overestimated what the boatyard fees, paint and parts were going to cost me. Yay! How much did I save? Almost exactly the cost of the new propeller. Hmm. I can live with that.
Get me out of this boatyard so I can spend the next three days trying to get blue boat paint out of places where the sun don't shine.
Motored back to the pen, and spent the next three days doing just that.
Well not 'just' that. I also did the wiring up from the sensors to the instruments, and paid yet another guy to go to the top of the mast and fit the sensors for the new wind instrument. Then wired that up.
 |
| The original Signet depth gauge. |
 |
| Wind instrument on the left, combined depth and speed on right, |
My new pretty instruments are also pretty clever. These and the auto-pilot are all able to be 'networked'. Unfortunately I didn't get the same brand of chart-plotter, so that's putting some limits on the network capability, but when I next have some pocket money ...
So there it is, my progress over the last several weeks.
I'm now at the point where I need to spend about two hours tidying up the loose ends and debris, then buy provisions, get an exit clearance and sail away. Probably tomorrow. I'll let you know before I go though. Promise.
Wayne.
Subscribe to:
Posts (Atom)